We've concentrated on letting the user choose the location of the new monuments so far, but we still need to gain functionality; monuments used to have a picture associated with them which was shown in the information popup. Let's fix this by allowing the user to upload their image when creating a new monument. To do so, we will see how we can manage file uploads with Livewire first, and then, we will integrate an excellent Javascript library that will make our form look very nice: Filepond.
- Let's first see how Livewire works with file uploads; just like we did for the labels and text input, we will create a blade component for the file input to organize our code better and reuse this component in other pages/forms. Create a resources/views/components/input/image.blade.php file with the following content:
<input type="file" {{ $attributes }}>
-
It is straightforward for now, just an html input with type="file" with blade forwarded attributes; we will adjust this component when we integrate Filepond later in this lesson.
-
Now let's add this component to the new monument form, just like we did with the input text; we will also reuse the label component and the Jetstream x-jet-input-error-component, make the following changes to the resources/views/livewire/monuments/create.blade.php file:
<div class="px-1 py-2">
    <div wire:ignore>
        <button x-show="mode === 'view'" x-on:click="startDrawMonument()" title="Start drawing"
            class="text-slate-500 transition hover:text-slate-800 focus:text-slate-800 focus:outline-none">
            Start drawing
        </button>
        <button x-show="mode === 'draw'" x-on:click="stopDrawMonument()" title="Stop drawing"
            class="text-slate-500 transition hover:text-slate-800 focus:text-slate-800 focus:outline-none">
            Stop drawing
        </button>
    </div>
    <form action="" wire:submit.prevent="save" class="mt-1 space-y-1">
        <div>
            <x-input.label for="longitude" value="Longitude" />
            <x-input.text wire:model.defer="coordinates.0" id="longitude" />
            <x-jet-input-error for="coordinates.0" class="mt-1" />
        </div>

        <div>
            <x-input.label for="latitude" value="Latitude" />
            <x-input.text wire:model.defer="coordinates.1" id="latitude" />
            <x-jet-input-error for="coordinates.1" class="mt-1" />
        </div>

        <div>
            <x-input.label for="name" value="Name" />
            <x-input.text wire:model.defer="name" id="name" />
            <x-jet-input-error for="name" class="mt-1" />
        </div>

        <div>
            <x-input.label for="upload" value="Picture" />
            <x-input.image wire:model.defer="upload" id="upload-{{ $uploadId }}" />
            <x-jet-input-error for="upload" class="mt-1" />
        </div>

        <div class="pt-3 flex justify-end items-center space-x-3">
            <x-jet-action-message class="mr-3" on="saved" />

            <x-jet-secondary-button type="submit" wire:loading.attr="disabled" wire:target="save">
                Save
            </x-jet-secondary-button>
        </div>
    </form>
</div>
- We used wire:model.defer="upload" on the component view, so we now need to declare this property in the server component; we also need to use the WithFileUploads trait to tell Livewire we will upload files. Let's define a few Laravel validation rules and custom error messages for this new property. In the app/Http/Livewire/Monuments/Create.php file, make the following adjustments:
<?php

namespace App\Http\Livewire\Monuments;

use Livewire\Component;
use App\Models\Monument;
use Illuminate\Support\Facades\DB;
use Livewire\WithFileUploads;

class Create extends Component
{
    use WithFileUploads;

    public $coordinates = [];
    public $name;
    public $upload;
    public $uploadId;

    protected $rules = [
        'coordinates.0' => 'required|numeric|between:-180,180',
        'coordinates.1' => 'required|numeric|between:-90,90',
        'name' => 'required|string|max:255|unique:monuments,name',
        'upload' => 'required|file|mimes:png,jpg|max:4096',
    ];

    protected $messages = [
        'coordinates.0.required' => 'The longitude is required.',
        'coordinates.0.numeric' => 'The longitude must be a number.',
        'coordinates.0.between' => 'The longitude must be between -180 and 180.',
        'coordinates.1.required' => 'The latitude is required.',
        'coordinates.1.numeric' => 'The latitude must be a number.',
        'coordinates.1.between' => 'The latitude must be between -90 and 90.',
        'name.required' => 'The name is required.',
        'name.string' => 'The name must be a string.',
        'name.max' => 'The name may not be greater than 255 characters.',
        'name.unique' => 'The name has already been taken.',
        'upload.required' => 'The image is required.',
        'upload.file' => 'The image must be a file.',
        'upload.mimes' => 'The image must be a file of type: png, jpg.',
        'upload.max' => 'The image may not be greater than 4096 kilobytes.',
    ];

    public function save()
    {
        $this->validate();

        $monumentId = Monument::insertGetId([
            'name' => $this->name,
            'geom' => DB::raw("ST_GeomFromText('POINT({$this->coordinates[0]} {$this->coordinates[1]})')"),
            'user_id' => auth()->id(),
        ]);

        $this->coordinates = [];
        $this->name = '';

        $this->emit('saved');

        $geojson = Monument::query()
            ->where('id', $monumentId)
            ->selectRaw('st_asgeojson(monuments.*) as geojson')
            ->firstOrFail()
            ->geojson;

        $this->dispatchBrowserEvent('new-monument', ['monument' => $geojson]);
    }

    public function render()
    {
        return view('livewire.monuments.create');
    }
}
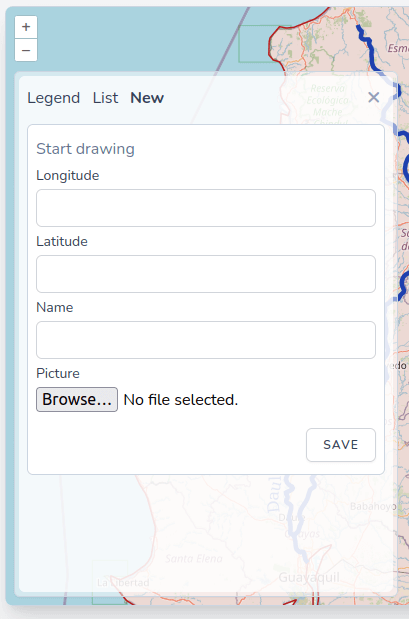
- The form should now look like this, not so pretty, but we will fix it later with Filepond:
- We created a few Laravel validation rules, requiring the file and forcing it to be a jpg or png no bigger than 4MB. The code we have is all we need to test these rules. With the WithFileUploads trait, Livewire will automatically let the file upload to a temporary directory in the storage of our app. Let's try it first without uploading a file:
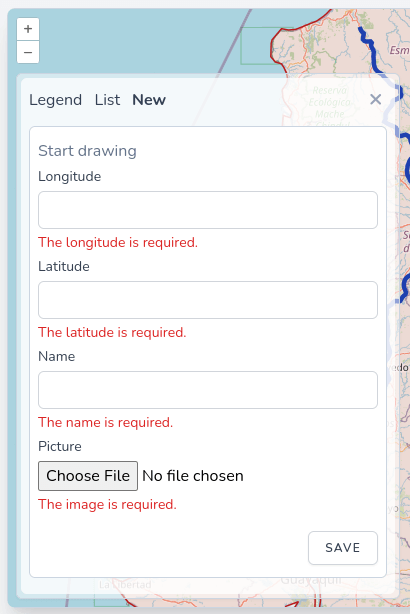
- We can witness that the required rule is working correctly. Let's try uploading a file and see if the mimes rule works with a 400KB zip file now:
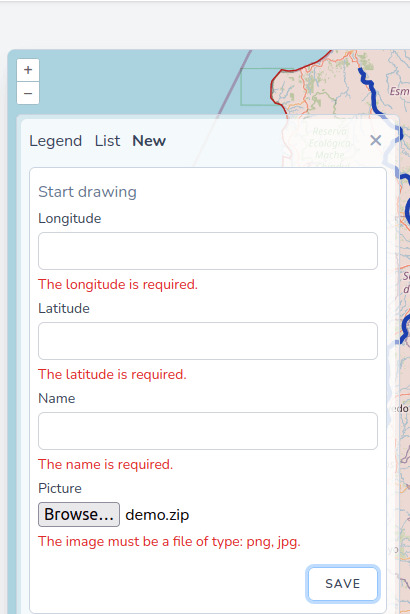
- Great, the mimes rule is also working; now let's try with an actual 300KB jpg file:
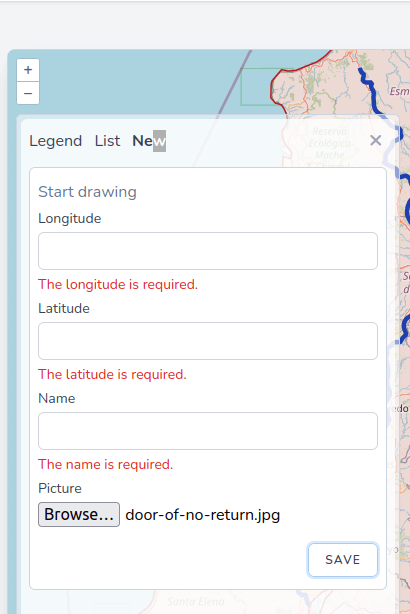
- Good! It seems to be working, but let's try with a bigger image (2.1MB):
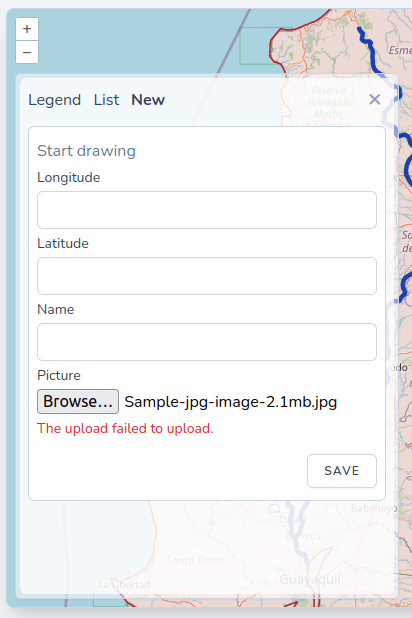
- Oops! Now we have an error before we even click save; let's see what's happening in the network tab of the browser's developers tools:

- We get a 413 Request Entity Too Large error on the Livewire upload route. This is because nginx refuses the file before it even hits php-fpm; by default, nginx has a maximum body size of 1 MB, so we will have to tweak it a little bit. Let's add the following line to the docker/nginx/nginx-site.conf file:
server {
    listen 80;
    root /var/www/app/public;
    index index.php;
    server_name _;
    client_max_body_size 4M;

    location / {
         try_files $uri $uri/ /index.php$is_args$args;
    }

    location ~ \.php$ {
        try_files $uri =404;
        fastcgi_split_path_info ^(.+\.php)(/.+)$;
        fastcgi_pass php:9000;
        fastcgi_index index.php;
        include fastcgi_params;
        fastcgi_param SCRIPT_FILENAME $document_root$fastcgi_script_name;
        fastcgi_param PATH_INFO $fastcgi_path_info;
    }

    location ^~ /geoserver/ {
        proxy_set_header X-Real-IP $remote_addr;
        proxy_set_header Host $http_host;
        proxy_set_header X-Forwarded-Proto http;
        proxy_set_header X-Forwarded-For $proxy_add_x_forwarded_for;
        proxy_pass http://geoserver:8080/geoserver/;
    }
}
- Now we need to restart the container for nginx to pick up the change:
docker-compose down
docker-compose up -d
dr npm run dev
- Let's retry with the same 2.1MB jpg file:

- Now we are getting a different error: 422 Unprocessable Content, this can be confusing, but now it's an error coming from php. PHP has a upload_max_filesize parameter in the php.ini file, and its default value is 2MB; we will have to increase it to 4MB (the maximum file size we defined in the validation rule. To be able to make quick changes to the php.ini values in our development environment, let's first create a docker/php/php.ini file and put the following content in it (please use the copy to clipboard button to get the content of the file as the entire content is almost 2000 lines and is not displayed on this page):
(...)
;;;;;;;;;;;;;;;;
; File Uploads ;
;;;;;;;;;;;;;;;;

; Whether to allow HTTP file uploads.
; https://php.net/file-uploads
file_uploads = On

; Temporary directory for HTTP uploaded files (will use system default if not
; specified).
; https://php.net/upload-tmp-dir
;upload_tmp_dir =

; Maximum allowed size for uploaded files.
; https://php.net/upload-max-filesize
upload_max_filesize = 2M
upload_max_filesize = 4M

; Maximum number of files that can be uploaded via a single request
max_file_uploads = 20
(...)
Please note that this file contains default development php settings and is not suited for production; we will use a different file for the production environment in a future lesson.
- Just like we did with the nginx config file, let's bind mount this file in the docker container. Make the following change to the docker-compose.yml file:
(...)
        volumes:
            - ./:/var/www/app
            - ./docker/nginx/nginx-site.conf:/etc/nginx/conf.d/default.conf
        networks:
            - frontend
            - backend
    php:
        build:
            context: ./docker/php
            dockerfile: Dockerfile
        image: laravelgis-php:latest
        ports:
            - "5173:5173"
        volumes:
            - ./:/var/www/app
            - ./docker/php/php.ini:/usr/local/etc/php/php.ini
        networks:
            - backend
    postgres:
        image: postgis/postgis:15-3.3
        volumes:
            - postgres-data:/var/lib/postgresql/data
(...)
- Now we need to restart the container for php to pick up the change:
docker-compose down
docker-compose up -d
dr npm run dev
- Let's retry with the same 2.1MB jpg file:
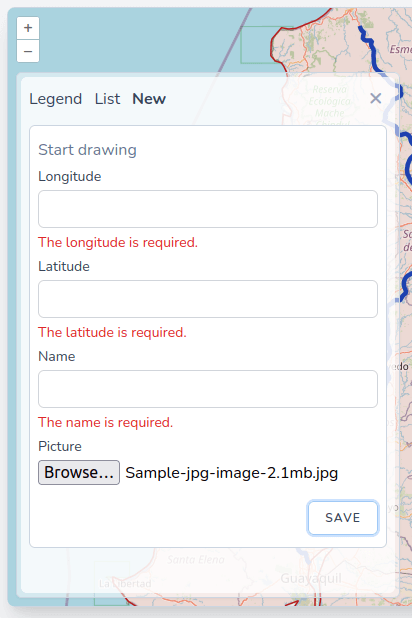
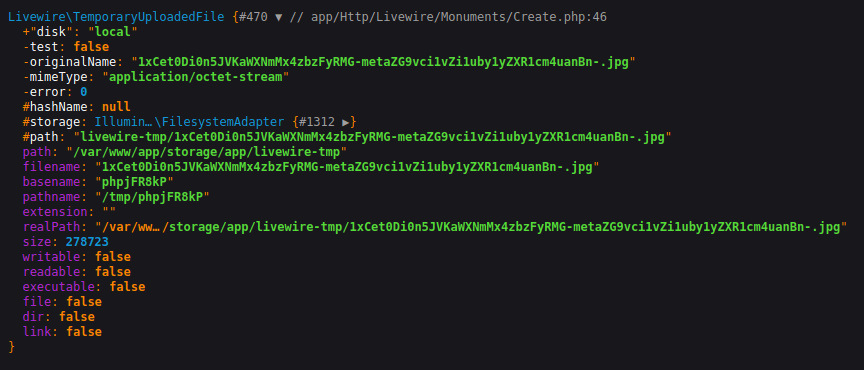
- Great! The file is now correctly uploaded, and it passes the validation rules. We will assume the max file size rule is working, too (we cannot test it because nginx and php will block uploads bigger than 4MB before it even hits our rule, but it's good practice to leave it there). The following questions are: the user has effectively uploaded an image to the server, but where did it go? How can we save it? Reference it in the monuments table and safely use it in the information popup? To answer these questions, let's first inspect what kind of variable/object the $upload property on the component is by adjusting the app/Http/Livewire/Monuments/Create.php like this:
(...)
    public function save()
    {
        $this->validate();

        dd($this->upload);

        $monumentId = Monument::insertGetId([
            'name' => $this->name,
            'geom' => DB::raw("ST_GeomFromText('POINT({$this->coordinates[0]} {$this->coordinates[1]})')"),
            'user_id' => auth()->id(),
        ]);

        $this->coordinates = [];
        $this->name = '';

        $this->emit('saved');

        $geojson = Monument::query()
            ->where('id', $monumentId)
            ->selectRaw('st_asgeojson(monuments.*) as geojson')
            ->firstOrFail()
            ->geojson;

        $this->dispatchBrowserEvent('new-monument', ['monument' => $geojson]);
    }

    public function render()
    {
        return view('livewire.monuments.create');
    }
}
- Now let's fill the form appropriately and hit save:
-
We have a Livewire\TemporaryUploadedFile object. The Livewire documentation states that "Livewire honors the same APIs Laravel uses for storing uploaded files" so we have access to the same function described in the Laravel documentation. Laravel has a very powerful API for file storage; we will try to make good use of it. Let's first see where we will store it and how we will reference the images in the database. We will create a file system disk to structure the application properly; this will also give us great flexibility as, if needed in production, for example, we could change the driver from local to Amazon S3. We also want the images to be private and unavailable to non-authenticated users. We will need a new column in the monuments table to store the file name for the image, and; to make sure our pictures are limited to authenticated users, we will create a particular route and controller to access them.
-
Let's first create the new column in the monuments table in a migration:
dr php artisan make:migration add_image_file_column_to_monuments_table
sudo chmod a+w database/migrations/*add_image_file_column_to_monuments_table.php
- The content of the new migration should be as follows:
<?php

use Illuminate\Database\Migrations\Migration;
use Illuminate\Database\Schema\Blueprint;
use Illuminate\Support\Facades\Schema;

return new class extends Migration
{
    /**
     * Run the migrations.
     *
     * @return void
     */
    public function up()
    {
        Schema::table('monuments', function (Blueprint $table) {
            $table->string('image_file')->nullable();
        });
    }

    /**
     * Reverse the migrations.
     *
     * @return void
     */
    public function down()
    {
        Schema::table('monuments', function (Blueprint $table) {
            //
        });
    }
};
- Then, we can run the migrations:
dr php artisan migrate
- Now we need to create the storage disk for the images of the monuments in Laravel; in the config/filesystems.php file, let's add the following lines:
<?php

return [

    /*
    |--------------------------------------------------------------------------
    | Default Filesystem Disk
    |--------------------------------------------------------------------------
    |
    | Here you may specify the default filesystem disk that should be used
    | by the framework. The "local" disk, as well as a variety of cloud
    | based disks are available to your application. Just store away!
    |
    */

    'default' => env('FILESYSTEM_DISK', 'local'),

    /*
    |--------------------------------------------------------------------------
    | Filesystem Disks
    |--------------------------------------------------------------------------
    |
    | Here you may configure as many filesystem "disks" as you wish, and you
    | may even configure multiple disks of the same driver. Defaults have
    | been set up for each driver as an example of the required values.
    |
    | Supported Drivers: "local", "ftp", "sftp", "s3"
    |
    */

    'disks' => [

        'local' => [
            'driver' => 'local',
            'root' => storage_path('app'),
            'throw' => false,
        ],

        'monuments' => [
            'driver' => 'local',
            'root' => storage_path('monuments'),
            'throw' => false,
        ],

        'public' => [
            'driver' => 'local',
            'root' => storage_path('app/public'),
            'url' => env('APP_URL') . '/storage',
            'visibility' => 'public',
            'throw' => false,
        ],

        's3' => [
            'driver' => 's3',
            'key' => env('AWS_ACCESS_KEY_ID'),
            'secret' => env('AWS_SECRET_ACCESS_KEY'),
            'region' => env('AWS_DEFAULT_REGION'),
            'bucket' => env('AWS_BUCKET'),
            'url' => env('AWS_URL'),
            'endpoint' => env('AWS_ENDPOINT'),
            'use_path_style_endpoint' => env('AWS_USE_PATH_STYLE_ENDPOINT', false),
            'throw' => false,
        ],

    ],

    /*
    |--------------------------------------------------------------------------
    | Symbolic Links
    |--------------------------------------------------------------------------
    |
    | Here you may configure the symbolic links that will be created when the
    | `storage:link` Artisan command is executed. The array keys should be
    | the locations of the links and the values should be their targets.
    |
    */

    'links' => [
        public_path('storage') => storage_path('app/public'),
    ],

];
- We will need a new route along with a controller to create a secure link to these files; we will then save this link in the image column of the images. Let's first create the controller:
dr php artisan make:controller MonumentsImagesController
sudo chmod a+w app/Http/Controllers/MonumentsImagesController.php
- The newly created controller should contain the following code:
<?php

namespace App\Http\Controllers;

use App\Models\Monument;
use Illuminate\Http\Request;
use Illuminate\Support\Facades\Auth;
use Illuminate\Support\Facades\Storage;

class MonumentsImagesController extends Controller
{
    public function __invoke(Monument $monument)
    {
// If no user is authenticated, we don't want to redirect to the login page
// we only want to return a 404 page not found
        if(! Auth::check()){
            abort(404);
        }

        return Storage::disk('monuments')->response($monument->image_file);
    }
}
- Now let's add the route to the images of the monuments; in the routes/web.php file, add the following lines:
<?php

use App\Http\Controllers\MonumentsImagesController;
use Illuminate\Support\Facades\Route;

/*
|--------------------------------------------------------------------------
| Web Routes
|--------------------------------------------------------------------------
|
| Here is where you can register web routes for your application. These
| routes are loaded by the RouteServiceProvider within a group which
| contains the "web" middleware group. Now create something great!
|
*/

Route::get('/', function () {
    return view('welcome');
});

Route::middleware([
    'auth:sanctum',
    config('jetstream.auth_session'),
    'verified'
])->group(function () {
    Route::get('/dashboard', function () {
        return view('dashboard');
    })->name('dashboard');
});

// We don't want to use the auth middleware, we are manually checking for authentication in the controller
Route::get('/monuments/{monument}/image', MonumentsImagesController::class)->name('monument-image');
- Finally, we can now save the image and store its name and link along with the monument in the app/Http/Livewire/Monuments/Create.php file:
(...)
    public function save()
    {
        $this->validate();

        dd($this->upload);

        $monumentId = Monument::insertGetId([
            'name' => $this->name,
            'geom' => DB::raw("ST_GeomFromText('POINT({$this->coordinates[0]} {$this->coordinates[1]})')"),
            'user_id' => auth()->id(),
        ]);

// We need to do it in two times as we need the monument model to create the monument-image route
// This is not optimal but it's just ok in our case, we will refactor this code in a future lesson
        $monument = Monument::create([
            'name' => $this->name,
            'geom' => DB::raw("ST_GeomFromText('POINT({$this->coordinates[0]} {$this->coordinates[1]})')"),
// The $this->upload->store('/', 'monuments') function will store the image a the root of the monuments disk
// and return a unique name for the stored files
            'image_file' => $this->upload->store('/', 'monuments'),
            'user_id' => auth()->id(),
        ]);

// The route('monument-image', $monument) function will return a link to the specific image
// like http://localhost:8080/monuments/12/image, this route will trigger the controller which will
// return the image as a response
        $monument->image = route('monument-image', $monument);
        $monument->save();

        $this->coordinates = [];
        $this->name = '';
        $this->upload = null;
// Livewire hack to automatically reset the input file client-side
        $this->uploadId = now()->timestamp;

        $this->emit('saved');

        $geojson = Monument::query()
            ->where('id', $monumentId)
            ->where('id', $monument->id)
            ->selectRaw('st_asgeojson(monuments.*) as geojson')
            ->firstOrFail()
            ->geojson;

        $this->dispatchBrowserEvent('new-monument', ['monument' => $geojson]);
    }

    public function render()
    {
        return view('livewire.monuments.create');
    }
}
- Let's truncate the monuments table to clear all monuments in the database and try it in the browser:
dr php artisan tinker
App\Models\Monument::truncate();
exit
- Great, it's working! If we have a look at the content of the monuments table, we will see that the image and image_file columns now contain the route of the image as well as the file name:

- The functionality is now working, but on the security side, things are not optimal, we have this new image_file column which is only for internal use, and we are "leaking" it to the browser (with geoserver and with the Laravel application). This is not catastrophic, but let's fix this before continuing with the client-side (Filepond) of the upload functionality. We will use a view to share only the fields we want to the browser; let's create it in a migration:
dr php artisan make:migration create_monuments_view
sudo chmod a+w database/migrations/*create_monuments_view.php
- In the newly created migration, add the following code:
<?php

use Illuminate\Support\Facades\DB;
use Illuminate\Support\Facades\Schema;
use Illuminate\Database\Schema\Blueprint;
use Illuminate\Database\Migrations\Migration;

return new class extends Migration
{
    /**
     * Run the migrations.
     *
     * @return void
     */
    public function up()
    {
        DB::statement('CREATE OR REPLACE VIEW monuments_view AS
            SELECT
                monuments.id,
                monuments.name,
                monuments.image,
                monuments.geom,
                users.name AS user_name
            FROM monuments
            JOIN users ON users.id = monuments.user_id
        ');
    }

    /**
     * Reverse the migrations.
     *
     * @return void
     */
    public function down()
    {
        //
    }
};
- Then, we can run the migrations:
dr php artisan migrate
- With this view, we filtered the timestamps, user_id and image_file columns, and we added a convenient user_name column that we could use client-side (in the information popup). First, we will use this view instead of the table to generate the data for the browser event in the save method of the app/Http/Livewire/Monuments/Create.php file:
(...)
    public function save()
    {
        $this->validate();

        $monument = Monument::create([
            'name' => $this->name,
            'geom' => DB::raw("ST_GeomFromText('POINT({$this->coordinates[0]} {$this->coordinates[1]})')"),
            'image_file' => $this->upload->store('/', 'monuments'),
            'user_id' => auth()->id(),
        ]);

        $monument->image = route('monument-image', $monument);
        $monument->save();

        $this->coordinates = [];
        $this->name = '';
        $this->upload = null;
        $this->uploadId = now()->timestamp;

        $this->emit('saved');

        $geojson = Monument::query()
            ->where('id', $monument->id)
            ->selectRaw('st_asgeojson(monuments.*) as geojson')
            ->firstOrFail()
            ->geojson;

        $geojson = DB::table('monuments_view')
            ->where('id', $monument->id)
            ->selectRaw('st_asgeojson(monuments_view.*) as geojson')
            ->get()
            ->first()
            ->geojson;

        $this->dispatchBrowserEvent('new-monument', ['monument' => $geojson]);
    }
(...
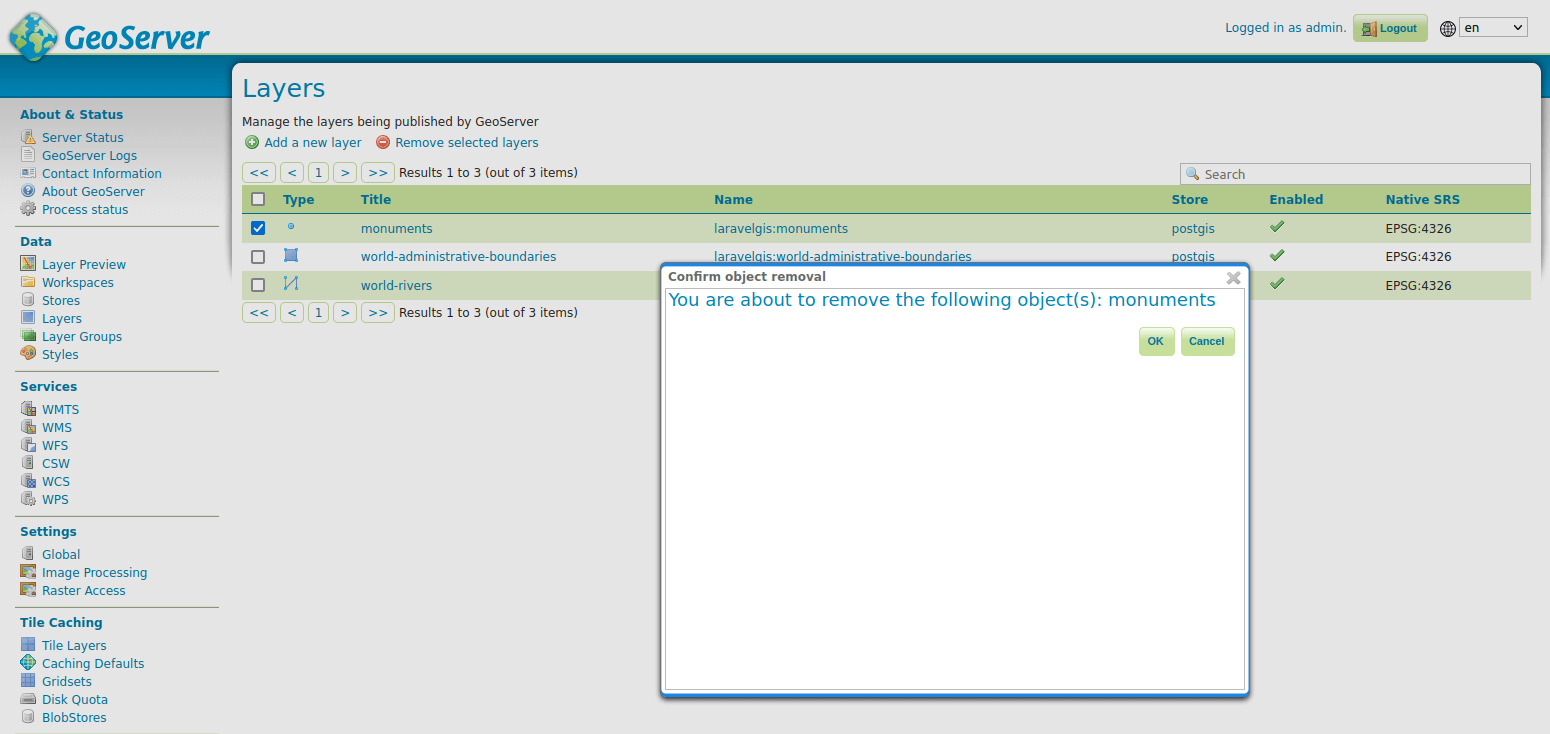
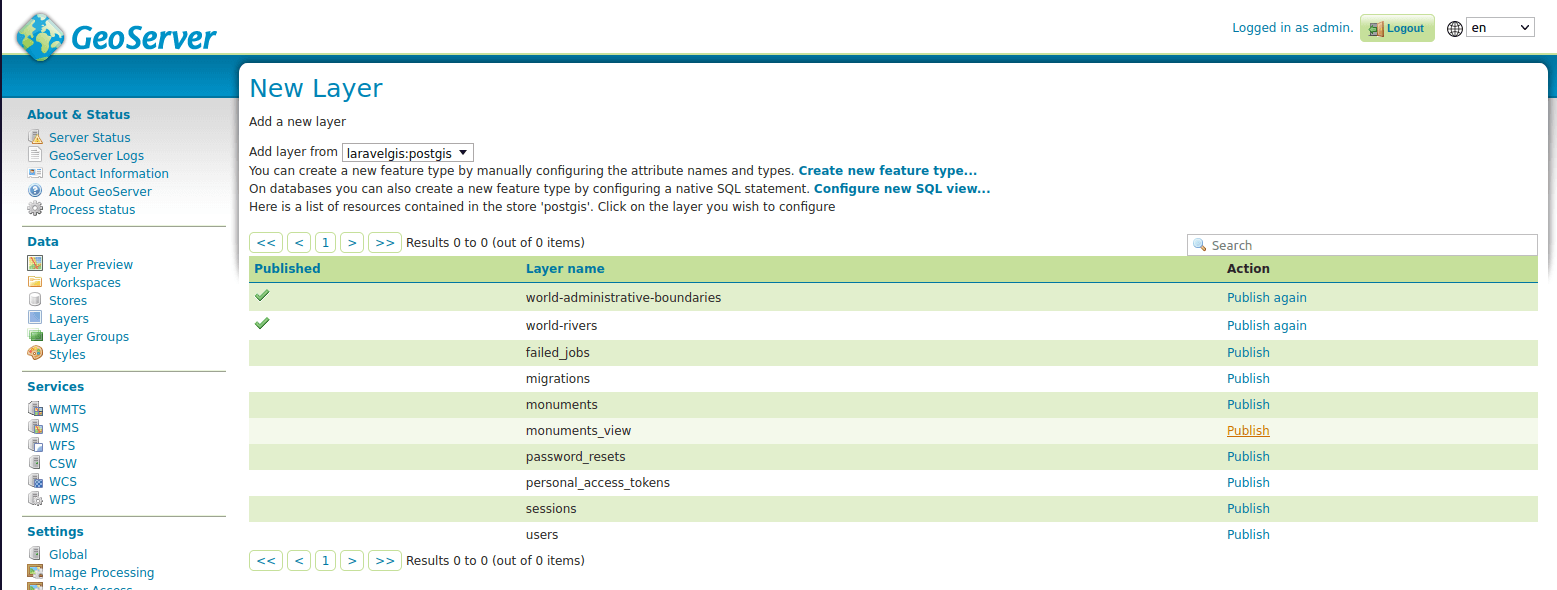
- When creating a monument, we are not sharing too much information with the browser; the last step is to recreate the layer in geoserver using the monuments_view instead of the monuments table. To do so, in the geoserver administration panel, click Layers in the Data menu on the left-hand side of the page, select the monuments layer and click Remove selected layers, then confirm by clicking ok:
- Now on the same page, click Add new layer, Add layer from "laravelgis:postgis" and publish the monuments_view:
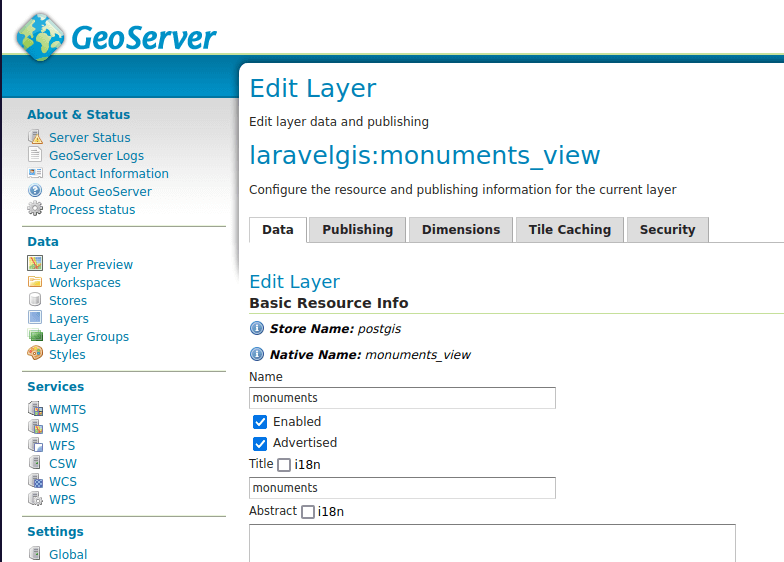
- Change the name and title to "monuments"
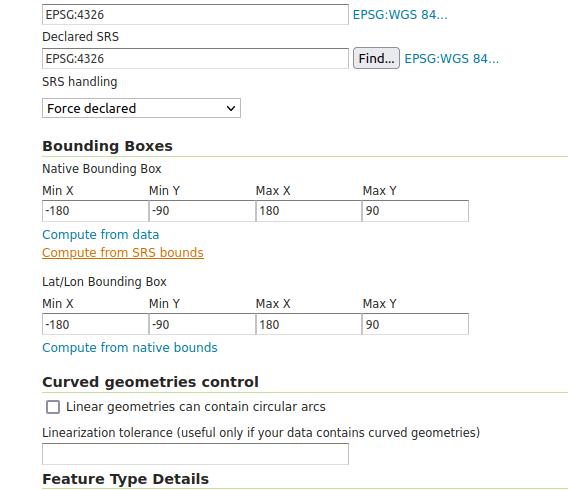
- Lower on the page, click on Compute from SRS bounds and Compute from native bounds:
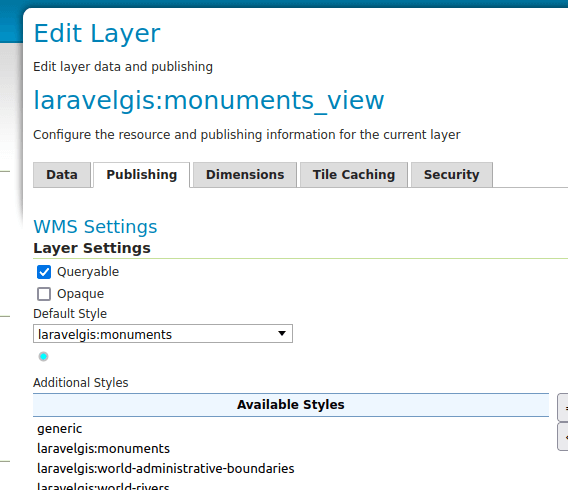
- Finally, in the Publishing tab, select the laravelgis:monuments as the default style and click Save at the bottom of the page:
- Good, we are not leaking internal information to the browser anymore. We can now work on the front-end user experience with file uploads using a very nice Javascript file upload library that works perfectly with Livewire: Filepond. First, let's install it with npm:
dr npm install filepond
- Just like we did with OpenLayers, we will need to create a component for Filepond, create a file named resources/js/components/filepond.js and put the following content in it:
import * as FilePond from "filepond";

window.FilePond = FilePond;
- We will also use Filepond default css with a minor tweak, create a file named resources/css/components/filepond.css and put the following content in it:
@import 'filepond/dist/filepond.min.css';

.filepond--panel-root {
    background-color: #fff;
}
- Now let's tell vite about these new files in the vite.config.js file:
import {
    defineConfig
} from 'vite';
import laravel, {
    refreshPaths
} from 'laravel-vite-plugin';

export default defineConfig({
    plugins: [
        laravel({
            input: [
                'resources/css/app.css',
                'resources/css/components/map.css',
                'resources/css/components/filepond.css',
                'resources/js/app.js',
                'resources/js/components/map.js',
                'resources/js/components/filepond.js',
            ],
            refresh: [
                ...refreshPaths,
                'app/Http/Livewire/**',
            ],
        }),
    ],
});
- Finally, we will make some significant changes to the resources/views/components/input/image.blade.php. Livewire file upload API supports Javascript and progress; see the documentation for more details. We will use it in the image component. Let's replace all of its content with the following:
<!-- We will use an inline Alpine.js component and again, use x-ref so we can use multiple components
     on the same page -->
<div class="border-dashed bg-white border-2 rounded-md p-1" wire:ignore x-data="state()"  x-on:clear-upload.window="clearUpload">
    <div>
        <input type="file" x-ref="filepond" {{ $attributes->whereDoesntStartWith('wire:model')->except(['id']) }}>
    </div>
</div>

@once
    @push('styles')
        @vite(['resources/css/components/filepond.css'])
    @endpush
    @push('scripts')
        @vite(['resources/js/components/filepond.js'])
        <script>
            function state() {
                return {
                    pond: {},
                    init() {
// We create the component and specify that it will not allow multiple file uploads
                        this.pond = window.FilePond.create(this.$refs.filepond, {
                            allowMultiple: false,
                        });
// We set the server Filepond options to work with Livewire using inline scripts to
// access the component from Javascript (see: https://laravel-livewire.com/docs/2.x/inline-scripts).
// We then use the process and revert Filepond API to support upload progress and remove upload
// The documentation for these options can be found here: https://pqina.nl/filepond/docs/api/server/#process
                        this.pond.setOptions({
                            server: {
                                process: (fieldName, file, metadata, load, error, progess, abort, transfer,
                                options) => {
                                    @this.upload('{{ $attributes->wire('model')->value() }}', file, load, error,
                                        progess);
                                },
                                revert: (filename, load) => {
                                    @this.removeUpload('{{ $attributes->wire('model')->value() }}', filename, load);
                                },
                            },
                        })
                    },
                    clearUpload() {
                        this.pond.removeFile();
                    },
                }
            }
        </script>
    @endpush
@endonce
- Now we can remove the Livewire id hack to clear the input file, make the following change in resources/views/livewire/monuments/create.blade.php:
(...)
        <div>
            <x-input.label for="name" value="Name" />
            <x-input.text wire:model.defer="name" id="name" />
            <x-jet-input-error for="name" class="mt-1" />
        </div>

        <div>
            <x-input.label for="upload" value="Picture" />
            <x-input.image wire:model.defer="upload" id="upload-{{ $uploadId }}"/>
            <x-input.image wire:model.defer="upload"/>
            <x-jet-input-error for="upload" class="mt-1" />
        </div>

        <div class="pt-3 flex justify-end items-center space-x-3">
            <x-jet-action-message class="mr-3" on="saved" />

            <x-jet-secondary-button type="submit" wire:loading.attr="disabled" wire:target="save">
                Save
            </x-jet-secondary-button>
        </div>
(...)
- And the following changes in app/Http/Livewire/Monuments/Create.php:
<?php

namespace App\Http\Livewire\Monuments;

use Livewire\Component;
use App\Models\Monument;
use Illuminate\Support\Facades\DB;
use Livewire\WithFileUploads;

class Create extends Component
{
    use WithFileUploads;

    public $coordinates = [];
    public $name;
    public $upload;
    public $uploadId;

    protected $rules = [
        'coordinates.0' => 'required|numeric|between:-180,180',
        'coordinates.1' => 'required|numeric|between:-90,90',
        'name' => 'required|string|max:255|unique:monuments,name',
        'upload' => 'required|file|mimes:png,jpg|max:4096',
    ];

    protected $messages = [
        'coordinates.0.required' => 'The longitude is required.',
        'coordinates.0.numeric' => 'The longitude must be a number.',
        'coordinates.0.between' => 'The longitude must be between -180 and 180.',
        'coordinates.1.required' => 'The latitude is required.',
        'coordinates.1.numeric' => 'The latitude must be a number.',
        'coordinates.1.between' => 'The latitude must be between -90 and 90.',
        'name.required' => 'The name is required.',
        'name.string' => 'The name must be a string.',
        'name.max' => 'The name may not be greater than 255 characters.',
        'name.unique' => 'The name has already been taken.',
        'upload.required' => 'The image is required.',
        'upload.file' => 'The image must be a file.',
        'upload.mimes' => 'The image must be a file of type: png, jpg.',
        'upload.max' => 'The image may not be greater than 4096 kilobytes.',
    ];

    public function save()
    {
        $this->validate();

        $monument = Monument::create([
            'name' => $this->name,
            'geom' => DB::raw("ST_GeomFromText('POINT({$this->coordinates[0]} {$this->coordinates[1]})')"),
            'image_file' => $this->upload->store('/', 'monuments'),
            'user_id' => auth()->id(),
        ]);

        $monument->image = route('monument-image', $monument);
        $monument->save();

        $this->coordinates = [];
        $this->name = '';
        $this->upload = null;
        $this->uploadId = now()->timestamp;

        $this->emit('saved');

        $geojson = DB::table('monuments_view')
            ->where('id', $monument->id)
            ->selectRaw('st_asgeojson(monuments_view.*) as geojson')
            ->get()
            ->first()
            ->geojson;

        $this->dispatchBrowserEvent('clear-upload');
        $this->dispatchBrowserEvent('new-monument', ['monument' => $geojson]);
    }

    public function render()
    {
        return view('livewire.monuments.create');
    }
}
- Our component looks pretty good now; let's rerun "dr npm run dev" and try it in the browser:
- We now have a very nice front-end user experience with upload progress! One last little perk before we finish the lesson, Filepond has many helpful plugins that we can easily use to make front-end validation and even image preview; let's implement a couple of them. First, we need to install them with npm:
dr npm install filepond-plugin-file-validate-size
dr npm install filepond-plugin-file-validate-type
dr npm install filepond-plugin-image-preview
- Then, we need to register them in the resources/js/components/filepond.js file:
import * as FilePond from "filepond";

window.FilePond = FilePond;

import FilePondPluginFileValidateType from "filepond-plugin-file-validate-type";
window.FilePond.registerPlugin(FilePondPluginFileValidateType);

import FilePondPluginFileValidateSize from "filepond-plugin-file-validate-size";
window.FilePond.registerPlugin(FilePondPluginFileValidateSize);

import FilePondPluginImagePreview from "filepond-plugin-image-preview";
window.FilePond.registerPlugin(FilePondPluginImagePreview);
import "filepond-plugin-image-preview/dist/filepond-plugin-image-preview.css";
- Finally, we need to configure a few options in resources/views/components/input/image.blade.php:
<div class="bg-white border border-slate-300 rounded-md p-1" wire:ignore x-data="state()" x-on:clear-upload.window="clearUpload">
    <div>
        <input type="file" x-ref="filepond" {{ $attributes->whereDoesntStartWith('wire:model')->except(['id']) }}>
    </div>
</div>

@once
    @push('styles')
        @vite(['resources/css/components/filepond.css'])
    @endpush
    @push('scripts')
        @vite(['resources/js/components/filepond.js'])
        <script>
            function state() {
                return {
                    pond: {},
                    init() {
                        this.pond = window.FilePond.create(this.$refs.filepond, {
                            allowMultiple: false,
                            acceptedFileTypes: ['image/png', 'image/jpeg'],
                            maxFileSize: '4MB',
                        });

                        this.pond.setOptions({
                            server: {
                                process: (fieldName, file, metadata, load, error, progess, abort, transfer,
                                options) => {
                                    @this.upload('{{ $attributes->wire('model')->value() }}', file, load, error,
                                        progess);
                                },
                                revert: (filename, load) => {
                                    @this.removeUpload('{{ $attributes->wire('model')->value() }}', filename, load);
                                },
                            },
                        })
                    },
                    clearUpload() {
                        this.pond.removeFile();
                    },
                }
            }
        </script>
    @endpush
@endonce
- I almost forgot; now that we are using the monument_view and have the user_name available, let's use it in the information popup by making the following adjustment in the resources/js/components/map.js file:
(...)
            gotoMonument(jsonFeature) {
                this.stopDrawMonument()

                this.map.getView().animate({
                    center: jsonFeature.geometry.coordinates,
                    zoom: 15,
                    duration: 500,
                });

                let content =
                    '<h4 class="text-gray-500 font-bold">' +
                    jsonFeature.properties.name +
                    '</h4>'
                    '</h4>' +
                    '<p class="text-gray-400 text-xs italic">Created by ' +
                    jsonFeature.properties.user_name +
                    '</p>'

                let image = jsonFeature.properties.image || '/img/placeholder-image.png'
                content +=
                    '<img src="' +
                    image +
                    '" class="mt-2 w-full max-h-[200px] rounded-md shadow-md object-contain overflow-clip">'

                this.$refs.popupContent.innerHTML = content

                this.monumentsLayer.getSource().updateParams({
                    'TIMESTAMP': Date.now()
                })

                setTimeout(() => {
                    this.map.getOverlayById('info').setPosition(
                        jsonFeature.geometry.coordinates
                    );
                }, 500)

            },
(...)
- Let's try one last time in the browser after rerunning "dr npm run dev":
Again, we've made significant progress in this lesson; we've learned how to upload with Livewire, how to use file upload server-side validation, how to store files in Laravel, how to serve these files only to authenticated users, and how to integrate Filepond with some of its plugins to have nice upload progress, preview, and validations. In the next lesson, we will go back to mapping and see a simple technique to show the user's location on the map.
The commit for this post is available here: uploading-pictures-with-livewire-and-filepond


Hi best developper,
due to problems with disk caching, I had to reinstall a new Ubuntu VM and try over your whole exercise again. The moment I installed openlayers the problems began. No OSM was shown...
As I became desperate, I tried a clone from gislaravel (not laravel-gis) to start from the point you ended in ch 18. I now have the laravel application running in gislaravel after 'dr npm run build' and 'dr npm i ol', 'docker-compose up' and all the five docker containers are running well. Nevertheless when opening localhost:8080 in the browser I get:
I did change the .env.example to .env and added localhost:8080, as the nginx is still forwarding from 8080 to 80 in the docker-compose.yml.
Can you give me any hint in what direction I have to look for in order to run the application from the gislaravel repo with the complete code uptil now?
A great many thanks already!
Hello Wim,
Try running:
With this, you should be good to go (you will obviously have to register a new user to be able to connect).
Cheers!
Nice to have your feedback so quickly!
Unfortunately to no avail, sorry to say. I cloned your gislaravel application again; I removed all docker images in my local cache and ran your above commands. All containers run well:
But the thrown errors in the postgres container are:
And the error in the dashboard (App \ Http \ Livewire \ Monuments \ Index : 35) when rendering the OSM map is:
Sorry to bother you with this one but I thought that cloning your gislaravel app with your committed code uptil chapter 18 would be a piece of cake.
Looking forward to your comment.
Just to remind that, obviously, after the creation of the new images, I made sure that the GeoServer container was configured correctly again with the right layer, global services and his proxy settings according to chapters 8 -9 about the Geoserver set up. But in its OpenLayers preview format I can not see the appearance of the OSM, neither in pgadmin geometry viewer. Is maybe something wrong in the databases?
Hello Wim,
I forgot, the dr php artisan migrate:fresh command will drop all tables in the database and rerun the migrations. After running this command, you will have to reimport world-rivers and world-administrative-boundaries (lesson 11) and ensure both layers are visible and working in Geoserver.
Good luck!
Spot on Sir!
After adding the two layers in the Postgis dbase and serving them again with GeoServer, the webgis page loads nicely with the monument pictures uploaded and the Filepond library.
I should have known that a migrate:fresh deleted the two vector layers in the laravelgis database...
Really looking ahead to your next contribution: the location of the user. You are a real front end web developper in Laravel, the least I can say.
Once you have finished that chapter and I can still follow along, I will ask you how to change the monuments layer into another layer with the locations of my lorawan sensors placed around the city of Leuven. In other words, to show me how you manage to create another or additional vector layer in the laravel framework and stored in a new table.
Very promising and thanks for the service.